Pages

Tuesday, December 29, 2009

Clouds and Stars

My latest photoshop creations have been with clouds, stars, and color overlay. I used photoshop CS4 extended and created the stars on my own with a brush and blurring as I couldn't find a picture with bright enough stars.


I've also made a banner with a similar theme that's for sale in my Etsy shop here.

Saturday, December 26, 2009

Tanzania 2009

I just recently went to Tanzania, Africa. The kids there were so much fun and I got lots of photos of them. These kids lead difficult lives, but live with a joy that is evident even through photographs.


Thursday, November 19, 2009

A Twist on Layer Masks

Here is a photo that I made in Photoshop Elements 6...


I just took the photo and duplicated it, and added color. Then I put it underneath the original that I had added and old photo texture to. Then, using layer masks, added the butterflies with a brush to expose the color image underneath.

Saturday, August 15, 2009

Simple, Versatile Photo Enhancing Technique

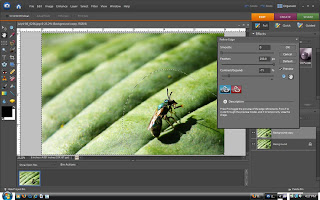
All of this was done using Adobe Photoshop Elements 6.

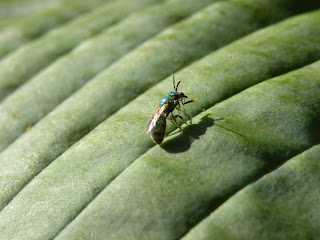
Here is the original photo:

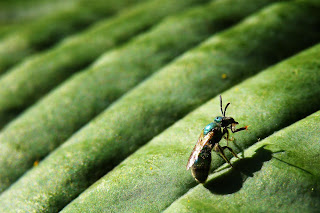
And here is the end result:


Steps:
1. First I cropped the image. I really liked how the lines lead your eye to the bee, so I didn't want to cut too much of that out. I also really liked the shadow and the out-of-focus area at the top left corner of the photo. With that in mind, I cropped as much as I could out of the image.

2. I always sharpen my image. Even if it doesn't look like it needs it, I am always surprised by how much sharper my image is afterward. I went to the "Enhance" drop-down menu at the top of the screen and clicked on "Unsharp Mask". Normally I have the numbers set at: amount 175%, radius 2 pixels, and threshold 3 levels. But this photo is more detailed, so I set the numbers to: amount 150%, radius to 1.5 pixels, and threshold 4. It all really depends on what works for the individual photo.

3. The color was really good, so next I just adjusted the contrast (go to "Enhance" and click on "lighting" and then "Brightness/Contrast"). I really love contrast, so I increased the contrast to +100.

4. Next, I wanted to emphasize the bee more, so I used the selection brush and made a selection of the bee and it's shadow. I made sure to include lots of the surrounding leaf as well.

5. Then I pressed shift+ctrl+I to invert the selection. Now everything BUT the bee and the surrounding leaf was selected.

6. Next I went to "Select" clicked on "Refine Edge" and set the numbers to: Smooth 0, Feather: 250 px., and Contract/Expand: -71%.


7. Next I clicked the bucket tool and set the numbers to Opacity 55%, Tolerance 255, and set the mode to "Soft Light". Then I clicked inside of the selected area.

8. Then just ctrl+D to deselect, and I have my enhanced image! I use this simple process on most of the photos that I enhance.

Something not clear? Have a question? Feel free to ask by leaving a comment below!


Sunday, May 24, 2009

Nikon P90 Superzoom Camera

I just bought a Nikon Coolpix P90 super-zoom camera.

My favorite things about it:
  • The optical zoom goes up to 24X (624mm equivalent).
  • It can focus up to 1 cm without the zoom for ultra-macro shots.
  • It is smaller and lighter than a DSLR and ideal for traveling while still getting quality shots.
  • It also has 12.1 megapixals while my DSLR has only 6.1 megapixals.
  • The shooting modes include:
    • sports
    • video
    • shutter priority
    • aperture priority
    • manual
    • auto
    • program
    • dusk/dawn
    • night landscape
    • close-up
    • food
    • museum
    • fireworks show
    • backlight
    • panorama assist
    • voice recording
  • Manual and automatic focus.
  • Tilting LCD
Example shots:

The first pictures are strait from the camera (not cropped or edited). Not as good of quality as a DLSR, but still really good for a point-and-shoot camera.

These first three pictures demonstrate the camera's zooming capabilities:

Widest shot:


This picture was taken from the exact same spot as the previous shot, but with the 24X optical zoom (zoomed into the bleeding hearts bush in the center of the picture above):


Again, this picture was taken from the exact same spot as the previous first two shots, but now with the 5x digital zoom on top of the 24x optical zoom:


With a little editing in photoshop elements:

Lighting levels adjustment was applied.


A little touching up and lighting adjustments,
and this picture turned out pretty well!


Close-up pictures with the P90 (no cropping):


Overall, I really like this camera and I would recommend it to anyone looking for something better than a point-and-shoot camera but lighter and smaller than a DSLR.

Thursday, May 21, 2009

Macro Filters

What are macro filters?

They substitute for macro lenses. They are filters that you can screw onto your dslr camera. They extend the focus range, allowing you to move in for closer pictures. The results aren't as good as with a real macro lens, but filters are more easily stored and much cheaper. Macro lenses cost around $500, while I got my macro filters for $15.

You can buy macro filters with different magnifications such as 1x, 2x, 4x, 10x, and others. You can use each filter on its own, or combine them for closer magnification. I have a 1x, 2x, 4x, and 10x that I use combined together.

All of these pictures came directly from my camera and have not been edited or cropped.


Without macro filters.


With macro filters (1x, 2x, 4x, 10x).

Some more pictures using the macro filters:


Saturday, May 2, 2009

Floating Illusion Using Layer Masks In Photoshop Elements

This is very simple and easy to do with great results!

1. First you need two photos. Mount your camera on a tripod because the camera CAN'T MOVE or else this won't work. Take the first photo with the object or person you want to appear to float suspended in the air.

To do this you can use a chair, ladder, etc.


2. Remove the person/object and whatever was suspending it and take another photo.


3.Place the photo with the person on top of the photo without the person. When finished, make sure both layers are simplified before continuing.

4. Now add an adjustment layer in photoshop elements (or layer mask in any other photoshop). Only add adjustment layer that won't change the appearance of your photo such as brighness/contrast or levels adjustment layers.

5. Now place the adjustment layer beneath the layer with the person in the layers palette.

6.Highlight the layer with the person in the layers palette and click "ctrl g" or go to the top of the screen click in the layer drop-down menu and click "group with previous". You should now have the layer with the person grouped with the adjustment layer. A small black arrow pointing from the top layer to the adjustment layer will indicate this.


7. Now, making sure the adjustment layer is highlighted, pain over the chairs with black. Made a mistake? Paint back over with white to reveal.

8. Next I added a shadow beneath the person using the burn tool and...


Pretty cool, huh?

Questions? Leave a comment below.